Paradeplatz Filler

Paradeplatz Filler: Ästhetik Zwischen Luxus, Natürlichkeit und Moderne

Die Welt der ästhetischen Behandlungen hat sich in den letzten Jahren stark verändert. Früher standen auffällige Veränderungen im Mittelpunkt, heute wünschen sich Menschen ein frisches, natürliches und harmonisches Aussehen. Genau aus diesem Grund gewinnt das Thema Paradeplatz Filler immer mehr Aufmerksamkeit. Moderne Beauty-Konzepte rund um den Paradeplatz verbinden Eleganz, Präzision und dezente Schönheitsoptimierung auf höchstem Niveau.

Wer sich heute für Filler interessiert, möchte meistens keine künstlichen Ergebnisse mehr. Stattdessen stehen individuelle Schönheit, sanfte Konturen und jugendliche Frische im Vordergrund. Paradeplatz Filler repräsentieren genau diesen modernen Ansatz der ästhetischen Medizin.

Warum Paradeplatz Filler Immer Beliebter Werden

Der Paradeplatz gilt als Symbol für Stil, Exklusivität und moderne Eleganz. In diesem Umfeld haben sich hochwertige ästhetische Behandlungen etabliert, die auf natürliche Resultate setzen. Menschen suchen heute gezielt nach Behandlungen, die ihre Persönlichkeit unterstreichen statt sie zu verändern.

Filler-Behandlungen sind deshalb so gefragt, weil sie vielseitig einsetzbar sind. Sie können Gesichtszüge sanft optimieren, Volumen zurückgeben und die Haut frischer wirken lassen – ohne lange Ausfallzeiten oder operative Eingriffe.

Besonders im urbanen Lifestyle gewinnen minimalinvasive Behandlungen immer mehr an Bedeutung. Viele Menschen möchten gepflegt aussehen, ohne dass kosmetische Eingriffe sofort sichtbar sind.

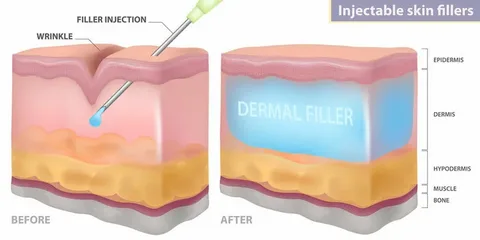
Was Sind Filler Eigentlich?

Filler sind spezielle Substanzen, die unter die Haut eingebracht werden, um Volumen aufzubauen oder Gesichtspartien zu modellieren. In den meisten modernen Anwendungen wird Hyaluronsäure verwendet, da sie natürlich im Körper vorkommt und Feuchtigkeit speichern kann.

Mit zunehmendem Alter verliert die Haut an Elastizität und Spannkraft. Dadurch entstehen feine Linien, eingefallene Gesichtspartien oder müde Gesichtsausdrücke. Genau hier kommen moderne Paradeplatz Filler zum Einsatz.

Das Ziel ist nicht die komplette Veränderung des Gesichts, sondern die Betonung natürlicher Schönheit.

Der Neue Trend: Weniger Auffällig, Mehr Natürlichkeit

Früher waren übertriebene Lippen oder stark modellierte Gesichtszüge oft Teil vieler Beauty-Trends. Heute verändert sich diese Entwicklung deutlich. Moderne ästhetische Behandlungen setzen auf Natürlichkeit und Balance.

Paradeplatz Filler stehen genau für diese neue Generation von Beauty-Behandlungen. Statt künstlicher Ergebnisse geht es um sanfte Verbesserungen, die das Gesicht frischer und harmonischer wirken lassen.

Viele Menschen wünschen sich heute Ergebnisse, bei denen Freunde oder Kollegen lediglich bemerken, dass man „erholt“ oder „strahlend“ aussieht – ohne direkt einen Eingriff zu erkennen.

Beliebte Bereiche Für Filler-Behandlungen

Filler können an unterschiedlichen Stellen des Gesichts angewendet werden. Je nach Wunsch und Gesichtsform entstehen individuelle Ergebnisse.

Lippen

Natürlich geformte Lippen gehören weiterhin zu den beliebtesten Anwendungen. Moderne Techniken setzen jedoch auf weiche Konturen statt auf extremes Volumen.

Wangen

Mit der Zeit verliert das Gesicht an Fülle. Filler können helfen, die Wangenpartie sanft aufzubauen und jugendlicher wirken zu lassen.

Kieferlinie

Eine definierte Jawline gilt heute als modernes Schönheitsmerkmal. Filler helfen dabei, klare Konturen zu schaffen.

Augenbereich

Müde Augen oder eingefallene Partien unter den Augen lassen das Gesicht älter wirken. Filler können hier für ein frischeres Erscheinungsbild sorgen.

Nasolabialfalten

Die Linien zwischen Nase und Mund gehören zu den häufigsten Zeichen der Hautalterung. Mit Fillern lassen sich diese Bereiche weicher erscheinen lassen.

Warum Individualität So Wichtig Ist

Jedes Gesicht besitzt eigene Proportionen und Besonderheiten. Genau deshalb funktionieren standardisierte Schönheitslösungen kaum noch. Moderne Paradeplatz Filler-Behandlungen basieren auf individuellen Konzepten.

Professionelle Ästhetik bedeutet heute, die natürliche Gesichtsstruktur zu analysieren und gezielt zu unterstützen. Gute Ergebnisse erkennt man oft gerade daran, dass sie nicht künstlich wirken.

Der Fokus liegt auf Harmonie, Symmetrie und einer authentischen Ausstrahlung.

Die Verbindung Zwischen Schönheit und Selbstbewusstsein

Ästhetische Behandlungen betreffen nicht nur das äußere Erscheinungsbild. Viele Menschen fühlen sich nach einer gelungenen Behandlung frischer, sicherer und selbstbewusster.

In einer modernen Gesellschaft, in der soziale Medien und digitale Kommunikation eine große Rolle spielen, wächst der Wunsch nach einem gepflegten Erscheinungsbild. Paradeplatz Filler bieten eine Möglichkeit, kleine Veränderungen mit großer Wirkung zu erzielen.

Dabei geht es weniger um Perfektion, sondern vielmehr um ein positives Lebensgefühl.

Moderne Ästhetik Als Teil Des Lifestyles

Beauty und Hautpflege sind längst Teil eines modernen Lebensstils geworden. Hochwertige ästhetische Behandlungen werden heute oft ähnlich betrachtet wie Fitness, gesunde Ernährung oder Wellness.

Paradeplatz Filler stehen symbolisch für diese Entwicklung. Sie verbinden medizinische Innovation mit stilvoller Ästhetik und individueller Beratung.

Menschen investieren zunehmend in Behandlungen, die ihnen helfen, langfristig frisch und vital auszusehen.

Worauf Man Bei Fillern Achten Sollte

Qualität und Erfahrung spielen bei ästhetischen Behandlungen eine entscheidende Rolle. Ein professionelles Beratungsgespräch und ein realistischer Behandlungsplan sind wichtige Voraussetzungen für natürliche Ergebnisse.

Zu viel Volumen oder unpassende Techniken können das Gesicht schnell unnatürlich wirken lassen. Deshalb setzen moderne jiltclinic Experten auf präzise und dezente Anwendungen.

Wer sich für Paradeplatz Filler interessiert, sollte Wert auf Erfahrung, Qualität und ein natürliches Ergebnis legen.

Fazit

Paradeplatz Filler stehen für eine neue Ära der ästhetischen Medizin. Statt extremer Veränderungen dominieren heute Natürlichkeit, Eleganz und individuelle Schönheit. Moderne Filler-Behandlungen helfen dabei, Gesichtszüge sanft zu optimieren und gleichzeitig die eigene Persönlichkeit zu bewahren.

Mit innovativen Techniken, hochwertiger Beratung und einem Fokus auf Harmonie entwickeln sich Paradeplatz Filler immer mehr zu einem festen Bestandteil moderner Beauty-Kultur. Wer sich ein frisches und authentisches Erscheinungsbild wünscht, findet in dieser ästhetischen Behandlung eine zeitgemäße Lösung für natürliche Schönheit und neues Selbstbewusstsein.

READ MORE

Why Clean Digital Artwork Matters for Printing Projects

Printing quality depends on many things. Good machines, strong ink, and quality paper all help. But one of the most important parts is the artwork itself. If the artwork is blurry, rough, or low quality, the final print will not look professional. This is why clean digital artwork is very important for every printing project.

Many businesses use Vector Art Conversion to turn rough images into sharp and scalable artwork for printing. Clean artwork helps logos, text, and graphics stay smooth on shirts, banners, stickers, signs, and other printed items. Without proper artwork preparation, printing projects can look faded, pixelated, or uneven.

At Absolute Digitizer, artwork experts often rebuild low-quality graphics into clean digital files to improve print quality and branding results.

What Is Clean Digital Artwork?

Clean digital artwork means graphics that are sharp, smooth, and ready for printing.

Features of Clean Artwork

  • Sharp edges
  • Smooth lines
  • Correct colors
  • High resolution
  • Balanced spacing

Good artwork looks professional both on screen and in print.

Why Printing Needs Clean Artwork

Printers follow the artwork exactly. If the design has flaws, the print will also show flaws.

Low-Quality Artwork Problems

  • Blurry text
  • Pixelated logos
  • Rough edges
  • Uneven colors

Clean Artwork Benefits

  • Better printing quality
  • Sharp images
  • Professional branding
  • Easy resizing

Good artwork improves every part of the printing process.

The Difference Between Raster and Vector Artwork

Understanding artwork types is very important.

Raster Images

Raster graphics use pixels.

Common Raster Formats

  • JPG
  • PNG
  • GIF

Problems with Raster Files

When enlarged, raster images become blurry.

Vector Artwork

Vector graphics use lines and curves instead of pixels.

Common Vector Formats

  • AI
  • EPS
  • SVG

Benefits of Vector Files

  • Infinite resizing
  • Sharp printing
  • Easy editing

Vector artwork is best for professional printing projects.

Why Logos Need Clean Artwork

Logos represent a brand.

Poor Logos Hurt Branding

Blurry logos look unprofessional.

Sharp Logos Build Trust

Clean designs improve business image.

Printing Needs Precision

Logos appear on shirts, signs, packaging, and banners.

At Absolute Digitizer, logo cleanup is a major part of preparing files for print production.

Clean Artwork Improves Color Accuracy

Color plays a huge role in printing.

Why Color Accuracy Matters

Brands need consistent colors everywhere.

Poor Artwork May Cause

  • Faded colors
  • Uneven shades
  • Wrong color matching

Clean Files Keep Colors Balanced

Professional artwork helps printers reproduce colors correctly.

This improves brand identity across products.

Printing Large Designs Requires Quality Artwork

Large prints need extra detail.

Banners and Signs

Large graphics must stay sharp from close and far away.

Vehicle Wraps

Designs need smooth curves and lines.

Posters

Text and images should remain clear.

Low-quality artwork becomes blurry when enlarged.

Small Prints Also Need Sharp Artwork

Tiny printed items need clean files too.

Business Cards

Text must stay readable.

Labels and Tags

Fine details should remain clear.

Stickers

Edges should look smooth and balanced.

Good artwork improves small print quality greatly.

Clean Artwork Saves Printing Time

Poor artwork can slow production.

Designers Spend More Time Fixing Files

Low-quality files often need rebuilding.

Printing Errors Cause Delays

Bad artwork may fail during printing.

Clean Files Speed Up Production

Ready-to-print artwork helps projects move faster.

This saves time for both printers and clients.

Better Artwork Reduces Printing Costs

Mistakes in printing waste money.

Reprints Cost More

Bad files may require printing again.

Material Waste Increases

Paper, vinyl, and fabric can get ruined.

Clean Files Reduce Errors

Good artwork lowers production problems.

Quality files help businesses save money over time.

Sharp Artwork Helps Embroidery Projects Too

Many printed logos are also used for embroidery.

Why Clean Artwork Helps Embroidery

Digitizers need clear images to create stitch files.

Blurry Designs Cause Problems

Small details may become unclear.

Sharp Artwork Improves Stitch Quality

Simple and clean graphics convert better into embroidery.

At Absolute Digitizer, artwork cleanup often improves both printing and embroidery results.

Why Proper Resolution Matters

Resolution controls image quality.

Low Resolution Problems

  • Blurry prints
  • Rough lines
  • Poor detail

High Resolution Benefits

  • Sharp printing
  • Better clarity
  • Professional results

Good resolution improves print quality greatly.

Simple Artwork Often Prints Better

Complex artwork can create printing issues.

Too Many Details Cause Problems

Tiny shapes may not print clearly.

Heavy Effects Can Look Messy

Shadows and gradients may lose detail.

Clean Shapes Work Best

Simple graphics stay sharp and readable.

Minimal designs often create stronger visual impact.

Clean Edges Improve Final Results

Edges are important in design quality.

Rough Edges Look Unprofessional

Jagged shapes reduce print quality.

Smooth Edges Improve Clarity

Clean lines make graphics easier to read.

Vector Files Create Better Edges

Curves stay smooth at every size.

This helps logos and graphics look polished.

Artwork Cleanup Helps Brand Consistency

Businesses need the same look everywhere.

Consistent Branding Builds Trust

Customers recognize familiar colors and logos.

Matching Designs Improve Professionalism

All printed items should look the same.

Clean Files Keep Branding Stable

Proper artwork helps maintain design quality across products.

Consistency is important for long-term business success.

Why File Formats Matter

Different printers use different file types.

Common Print File Formats

  • PDF
  • AI
  • EPS
  • SVG

Wrong Formats Cause Problems

Some files may lose quality during printing.

Professional Files Improve Results

Correct formats help printers work accurately.

Choosing the right format protects artwork quality.

Clean Artwork Makes Editing Easier

Printing projects often need updates.

Easy Resizing

Vector files can change size without losing quality.

Simple Color Changes

Clean layers make editing faster.

Faster Design Updates

Professional files save time during revisions.

Good artwork keeps projects flexible.

How Experts Prepare Artwork for Printing

Professional designers follow careful steps.

Step 1: Check Image Quality

They inspect the original file carefully.

Step 2: Remove Flaws

They clean rough edges and broken shapes.

Step 3: Convert to Vector

They rebuild the design using curves and lines.

Step 4: Test the Artwork

They check scaling, color, and print quality.

These steps improve the final printed result.

Common Printing Problems Caused by Bad Artwork

Pixelation

Images become blurry when enlarged.

Uneven Colors

Poor files may print incorrect shades.

Missing Details

Small elements may disappear.

Jagged Text

Fonts may look rough and unreadable.

Clean artwork helps avoid these problems.

Why Experience Matters in Artwork Preparation

Artwork cleanup takes skill and practice.

Experts Spot Problems Early

Experienced designers notice issues quickly.

Better Design Choices

Professionals know what works for print.

Faster Solutions

Skilled artists fix files more efficiently.

Experience improves both speed and quality.

At Absolute Digitizer, experienced artwork specialists carefully prepare designs for professional printing projects.

Best Tips for Clean Printing Artwork

Use Vector Files When Possible

Vectors give the best print quality.

Keep Designs Simple

Simple artwork prints more clearly.

Avoid Tiny Details

Very small elements may not print well.

Check Colors Carefully

Always test brand colors before printing.

Save Proper File Formats

Use print-friendly formats like AI or PDF.

These habits improve print quality greatly.

Benefits of Clean Digital Artwork

Better Print Results

Designs stay sharp and smooth.

Stronger Branding

Professional graphics improve trust.

Faster Production

Printers work more efficiently.

Less Waste

Good files reduce costly mistakes.

Clean artwork supports better business results.

Final Thoughts

Clean digital artwork is one of the most important parts of any printing project. Sharp lines, balanced colors, and high-quality files help printed products look professional and attractive.

Poor artwork can create blurry prints, wasted materials, and weak branding. But clean and properly prepared files improve print quality, save time, and reduce production problems.

With the right tools, smart planning, and professional experience, digital artwork can be transformed into clean and scalable graphics that work perfectly across all types of printing projects.

READ MORE

Smart Methods for Turning Artwork into Embroidery Patterns

Turning artwork into embroidery is not as simple as copying an image. Embroidery machines do not read normal pictures. They need a special stitch plan that tells them how to sew every line, shape, and color. This is why smart planning is very important in embroidery work.

Many designers use professional help like Digitize Logo for Embroidery to convert artwork into clean and machine-ready stitch files. This process helps keep designs sharp, smooth, and balanced when stitched on fabric. Without proper conversion, even a nice artwork can turn into a messy embroidery result.

At Digitizing Buddy, experts carefully study artwork before turning it into embroidery patterns. This helps improve stitch flow and fabric results for every project.

What Does It Mean to Turn Artwork into Embroidery Patterns?

Artwork conversion is the process of changing a digital image into a stitch file for embroidery machines.

Why This Step Is Needed

Embroidery machines cannot understand JPG or PNG images. They need stitch instructions instead.

What the File Controls

  • Stitch direction
  • Stitch type
  • Stitch density
  • Color changes
  • Stitch path

A good embroidery pattern acts like a map for the machine.

Why Smart Conversion Matters

Not all artwork is ready for embroidery.

Poor Conversion Problems

  • Uneven stitching
  • Broken thread
  • Blurry shapes
  • Fabric pulling

Smart Conversion Benefits

  • Clean stitch flow
  • Sharp design edges
  • Smooth fabric finish
  • Better durability

Smart methods help improve both look and quality.

Step 1: Start with Clean Artwork

Good embroidery starts with good artwork.

Use High-Quality Images

Clear images give better results.

Avoid Blurry Files

Low-quality images make digitizing hard.

Keep Designs Simple

Simple shapes convert better into stitches.

At Digitizing Buddy, designers often clean artwork before starting embroidery conversion.

Step 2: Remove Unnecessary Details

Not every detail works in embroidery.

Tiny Elements Cause Issues

Small lines may disappear during stitching.

Too Much Detail Overloads Design

Over-detailed art may look messy on fabric.

Smart Simplification Helps

Keep only strong and visible elements.

Simple designs stitch more cleanly.

Step 3: Choose the Right Fabric First

Fabric affects how embroidery looks.

Cotton Fabric

Easy and stable for stitching.

Stretch Fabric

Needs strong support and careful settings.

Thick Fabric

Requires balanced stitch density.

Soft Fabric

Needs gentle stitching and proper backing.

Good artwork conversion always considers fabric type.

Step 4: Convert Shapes into Stitch Paths

Stitch path is the direction stitches follow.

Why Stitch Path Matters

Bad paths create jumps and messy stitching.

Good Path Benefits

  • Smooth flow
  • Less thread break
  • Clean finish

Planning the Path

Start from one section and move logically across the design.

Experts always plan stitch paths carefully.

Step 5: Select Proper Stitch Types

Different stitches create different effects.

Satin Stitch

Used for borders and text.

Fill Stitch

Used for large areas.

Running Stitch

Used for outlines and fine details.

Choosing the right stitch improves embroidery quality.

Step 6: Control Stitch Density

Density controls how close stitches are placed.

High Density

Can make fabric stiff.

Low Density

May leave gaps in design.

Balanced Density

Gives smooth and soft embroidery.

Proper density is key for clean results.

Step 7: Add Underlay Stitches

Underlay stitches support the design.

Why Underlay Is Important

  • Stabilizes fabric
  • Improves top stitches
  • Prevents sinking

Common Types

Edge Run

Creates clean edges.

Zigzag Underlay

Supports satin stitches.

Fill Underlay

Supports large designs.

Good underlay improves the final embroidery look.

Step 8: Match Thread Colors Carefully

Color choice matters in embroidery.

Keep Brand Colors Accurate

Colors must match brand identity.

Limit Color Changes

Too many changes slow production.

Test Colors First

Some shades look different on fabric.

Color control improves design clarity.

At Digitizing Buddy, color matching is tested before final production.

Step 9: Simplify Gradients and Effects

Embroidery cannot handle all digital effects.

Gradients Are Difficult

They may not stitch smoothly.

Shadow Effects May Fail

Small details can get lost.

Use Solid Colors Instead

Solid shapes work best for embroidery.

This keeps designs clean and readable.

Step 10: Adjust for Stitch Direction

Stitch direction changes design appearance.

Better Fabric Control

Proper angles reduce pulling.

Improved Shine

Thread reflects light differently based on direction.

Stronger Texture

Direction adds depth to embroidery.

Experts carefully set stitch angles for better results.

Step 11: Test the Design Before Final Use

Testing is a must in embroidery.

Why Testing Helps

Even perfect-looking files can fail on fabric.

What to Check

  • Stitch quality
  • Fabric movement
  • Thread tension
  • Shape accuracy

Fix Small Issues Early

Testing helps avoid big production problems.

Step 12: Match Design Size to Fabric

Size affects embroidery quality.

Small Designs

Need simple details.

Large Designs

Need balanced density.

Medium Designs

Work well for most fabrics.

Correct sizing improves stitch clarity.

Step 13: Avoid Overcrowding the Design

Too many elements can ruin embroidery.

Keep Space Clean

Empty space helps design stand out.

Avoid Heavy Layers

Too many stitches can damage fabric.

Focus on Key Elements

Highlight important parts of the design.

Simple layouts work better in embroidery.

Step 14: Prepare Files for Machines

Embroidery machines need specific formats.

Common File Types

  • DST
  • PES
  • EXP
  • JEF

Why File Format Matters

Each machine reads files differently.

Correct formatting ensures smooth stitching.

Step 15: Keep Stitch Flow Natural

Natural flow improves embroidery results.

Avoid Sharp Jumps

Sudden changes may break thread.

Use Smooth Transitions

Flow should feel continuous.

Plan Logical Movement

Design should be stitched step by step.

Good flow improves final appearance.

Step 16: Reduce Machine Stress

Smart conversion helps machines work better.

Less Thread Breaks

Balanced files reduce tension issues.

Faster Production

Smooth designs run without stops.

Better Machine Life

Proper files reduce wear and tear.

Good digitizing protects both design and machine.

Step 17: Improve Logo Conversion Quality

Logos are common in embroidery.

Keep Shapes Simple

Clean shapes stitch better.

Maintain Brand Identity

Logo must stay recognizable.

Avoid Tiny Fonts

Small text may not appear clearly.

At Digitizing Buddy, logo conversion is carefully tested for clarity and balance.

Step 18: Use Professional Digitizing Tools

Software plays a big role in embroidery conversion.

Popular Tools

  • Wilcom
  • Hatch
  • CorelDRAW

Why Tools Matter

They help control stitch details precisely.

Good tools improve accuracy and quality.

Step 19: Learn from Real Embroidery Samples

Experience improves skill.

Study Finished Products

Look at real stitched results.

Compare Before and After

Check artwork vs embroidery output.

Improve Settings Over Time

Adjust based on results.

This builds strong digitizing skills.

Step 20: Work with Expert Digitizers

Sometimes professional help is the best choice.

Why Experts Help

  • Better stitch planning
  • Cleaner results
  • Faster production

Experience Matters

Skilled digitizers understand fabric behavior.

Many businesses trust Digitizing Buddy for reliable embroidery conversion services.

Benefits of Smart Artwork Conversion

Clean Stitch Quality

Designs look smooth and sharp.

Better Fabric Finish

Fabric stays flat and neat.

Strong Branding

Logos look professional and clear.

Fewer Production Errors

Smart files reduce machine problems.

Good conversion improves every part of embroidery.

Common Mistakes to Avoid

Over-Detailing Artwork

Too many details cause stitch issues.

Ignoring Fabric Type

Different fabrics need different settings.

Skipping Testing

Testing prevents major errors.

Using Wrong Stitch Types

Incorrect stitches reduce quality.

Avoiding mistakes improves final results.

Final Thoughts

Turning artwork into embroidery patterns is a careful and smart process. It is not just about copying an image. It is about planning stitch flow, choosing correct settings, and understanding fabric behavior.

With the right methods, even simple artwork can become a clean and professional embroidery design. Small adjustments in stitch type, density, and direction make a big difference in final quality.

When done correctly, embroidery looks sharp, lasts longer, and represents brands in the best way possible.

READ MORE

How to Avoid Common Embroidered Patch Problems

Embroidered patches are used on jackets, hats, bags, uniforms, and many other items. They help brands, teams, and groups stand out with custom designs and logos. A clean patch looks sharp, strong, and professional. But patch making can sometimes lead to stitching issues, rough edges, or poor shape if the process is not done correctly.

Many people face Common Embroidered Patch Problems when they use poor-quality files, wrong fabric, or weak backing. These issues can make patches look messy and reduce their life. The good news is that most patch problems can be avoided with the right steps, tools, and planning.

At Absolute Digitizing, patch experts often test designs before full production to make sure the embroidery looks smooth and clean on every patch.

Why Patch Quality Matters

A patch is more than just thread on fabric. It represents a brand, club, company, or team.

First Impressions Matter

People notice patch quality right away.

Clean Patches Build Trust

Sharp embroidery makes products look more professional.

Strong Patches Last Longer

Good stitching keeps patches from falling apart.

Better Designs Improve Branding

A smooth patch helps logos and text stand out clearly.

Poor patch quality can hurt the look of the whole product.

Start with a High-Quality Digitized File

Good embroidery always begins with a strong digitized file.

Why Digitizing Is Important

The embroidery machine follows the stitch file exactly. If the file is poor, the patch will also look poor.

Good Digitizing Helps:

  • Smooth stitch flow
  • Clean borders
  • Proper density
  • Balanced thread paths

Poor Digitizing Causes:

  • Gaps in stitching
  • Uneven shapes
  • Thread breaks
  • Heavy stitch buildup

Absolute Digitizing creates tested embroidery files that help reduce patch production problems.

Choose the Right Patch Fabric

Fabric choice affects patch quality a lot.

Twill Fabric

Twill is one of the best fabrics for patches because it is strong and smooth.

Felt Fabric

Felt works well for vintage and soft-style patches.

Canvas Fabric

Canvas gives a strong and rough look for heavy-duty patches.

Avoid Weak Fabric

Thin or stretchy fabric may wrinkle during embroidery.

The right fabric helps stitches stay neat and balanced.

Use Strong Backing Material

Backing gives patches support and shape.

Why Backing Matters

Without good backing, patches may bend or wrinkle.

Common Backing Types

Cut-Away Backing

Strong and durable for heavy designs.

Tear-Away Backing

Easy to remove after stitching.

Plastic Backing

Adds stiffness to patches.

Match Backing to Design

Heavy designs need stronger support.

Good backing improves the life of the patch.

Keep Stitch Density Balanced

Density means how close stitches are placed together.

High Density Problems

Too many stitches can make patches stiff and rough.

Low Density Problems

Too few stitches may leave gaps in the design.

Balanced Density

Good density creates smooth and soft embroidery.

Testing density before production helps avoid many issues.

Use the Correct Needle

The needle affects thread flow and stitch quality.

Sharp Needles

Best for woven patch fabric.

Large Needles

Good for thick thread and heavy stitching.

Replace Old Needles

Dull needles may damage fabric and break thread.

A fresh needle helps patches look clean and neat.

Pick Quality Embroidery Thread

Thread quality changes the final look of patches.

Strong Thread Lasts Longer

Good thread resists breaking and fading.

Cheap Thread Causes Problems

Low-quality thread may snap or fray.

Match Thread to Patch Style

Different patch designs need different thread types.

Strong thread keeps patches looking professional.

Hoop Fabric Correctly

Hooping keeps fabric tight during stitching.

Tight Fabric Prevents Movement

Loose fabric may shift during embroidery.

Do Not Stretch Too Much

Too much pulling can warp the patch shape.

Smooth Out Wrinkles

Flat fabric gives cleaner stitching.

Good hooping helps create even embroidery.

Watch Thread Tension

Thread tension controls stitch balance.

Tight Tension

Can pull fabric and create puckering.

Loose Tension

May leave loops and messy stitches.

Test Before Production

Always test tension settings first.

Balanced tension improves patch quality greatly.

Avoid Poor Border Stitching

Patch borders are very important.

Why Borders Matter

Borders hold the patch shape together.

Common Border Problems

  • Loose edges
  • Uneven stitching
  • Broken thread

Use Strong Border Stitches

Merrow borders and satin borders work well for patches.

Clean borders make patches look finished and professional.

Use the Right Stitch Type

Different stitch styles work for different patch designs.

Satin Stitch

Great for text and smooth borders.

Fill Stitch

Best for large design areas.

Running Stitch

Good for fine details and outlines.

Using the wrong stitch type may reduce patch quality.

Keep Designs Simple

Very complex designs can cause embroidery issues.

Tiny Details May Disappear

Small text and thin lines may not stitch clearly.

Fewer Colors Help

Too many color changes slow production.

Clean Shapes Work Better

Simple logos stitch more smoothly.

Good patch design should stay clear and readable.

Test Every Patch Design

Testing is one of the best ways to avoid mistakes.

Why Testing Matters

A design may look perfect on screen but fail on fabric.

What to Check During Testing

  • Stitch quality
  • Border shape
  • Thread tension
  • Fabric pull
  • Patch size

Small fixes during testing can prevent large problems later.

Avoid Fabric Puckering

Puckering is one of the most common patch issues.

Causes of Puckering

  • Tight tension
  • Weak backing
  • Heavy stitch density
  • Loose hooping

How to Prevent It

  • Use proper stabilizer
  • Balance density
  • Hoop correctly
  • Test tension settings

Smooth fabric gives cleaner patch embroidery.

Clean the Embroidery Machine

A dirty machine can damage patch quality.

Remove Lint Often

Lint builds up during stitching.

Oil Moving Parts

Follow machine care instructions.

Check Thread Path

Thread should move smoothly through the machine.

Replace Worn Parts

Old parts may affect stitch quality.

Machine care helps avoid embroidery problems.

Slow Down Machine Speed

Fast stitching may cause thread breaks and uneven designs.

Slower Speed Helps:

  • Improve detail quality
  • Reduce thread breaks
  • Keep borders clean

Complex patches often stitch better at slower speeds.

Use Proper Patch Cutting Methods

Cutting affects the final patch shape.

Sharp Cutting Tools

Clean cuts improve patch edges.

Laser Cutting

Works well for detailed patch shapes.

Avoid Rough Edges

Poor cutting makes patches look messy.

Clean trimming gives a professional finish.

Protect Patches During Washing

Patches should stay strong after washing.

Use Quality Thread

Strong thread lasts longer.

Secure Backing Properly

Loose backing may peel away.

Follow Care Instructions

Wash patches gently when possible.

Good patch care improves durability.

Store Patches Correctly

Bad storage can damage finished patches.

Keep Patches Dry

Moisture can weaken fabric and glue.

Avoid Heat

High heat may warp patches.

Store Flat

Stacking patches poorly may bend edges.

Safe storage keeps patches looking fresh.

Learn from Production Mistakes

Every embroidery project teaches something useful.

Save Test Samples

Old samples help compare quality.

Write Down Settings

Track tension, thread, and density settings.

Study Failed Patches

Mistakes help improve future work.

At Absolute Digitizing, testing and reviewing samples is a big part of improving patch quality for clients.

Benefits of High-Quality Patches

Better Brand Image

Clean patches look professional.

Longer Product Life

Strong stitching lasts through wear and washing.

Happier Customers

Good quality builds customer trust.

Faster Production

Clean files reduce machine problems.

Quality patches help businesses stand out.

Signs of a Good Embroidered Patch

Smooth Stitching

No gaps or loose threads.

Strong Borders

Edges stay neat and firm.

Balanced Shape

Patch keeps its form without bending.

Clear Design

Text and logos stay readable.

These details show true embroidery quality.

Why Experience Matters in Patch Making

Patch embroidery takes skill and practice.

Experts Spot Problems Early

Experienced embroiderers notice issues fast.

Better File Planning

Skilled digitizers create smoother stitch paths.

Smarter Fabric Choices

Experts know which materials work best.

Good experience helps avoid costly mistakes.

Final Thoughts

Avoiding embroidered patch problems starts with careful planning and quality work. Clean digitizing, strong fabric, proper backing, and good machine setup all work together to create smooth and professional patches.

Small mistakes in density, tension, or hooping can affect the final result. That is why testing, practice, and attention to detail are very important in patch embroidery.

With the right methods and tools, businesses and embroidery shops can create patches that look sharp, last long, and represent brands with pride.

READ MORE
ai checkerNation

Beyond Detection: How an AI Checker Is Reshaping Digital Writing Standards

When Verification Becomes Part of Writing Itself

The rise of the ai checker has quietly changed how content is created, reviewed, and published. It is no longer just a final step in editing—it has become part of the writing process itself.

Writers today are no longer only thinking about grammar, tone, or clarity. They are also aware that their text may be evaluated by a system that assigns probability scores based on patterns. This awareness is slowly shaping how content is written from the start.

In other words, the AI checker is not just analyzing writing. It is influencing it.

What an AI Checker Actually Measures

Despite how it is often described, an AI checker does not “understand” text in a human sense. It does not interpret meaning or evaluate creativity.

Instead, it analyzes structural signals such as:

  • sentence predictability
  • repetition patterns
  • variation in vocabulary
  • statistical consistency of phrasing
  • overall linguistic smoothness

From these signals, it generates a likelihood estimate.

This means the tool is not identifying truth—it is measuring similarity to learned writing patterns.

The Illusion of Certainty

One of the biggest misconceptions about AI checkers is that they provide definitive answers.

In reality, they produce probabilistic results. For example:

  • “Likely AI-generated”
  • “Possibly human-written”
  • “Mixed probability detected”

These labels can feel authoritative, but they are not confirmations. They are algorithmic interpretations.

The problem arises when users treat these outputs as absolute judgment rather than statistical suggestion.

Why Human Writing Gets Flagged

A surprising issue with AI checker tools is that well-written human content is often flagged incorrectly.

Why does this happen?

Because many human writers naturally:

  • maintain consistent grammar
  • use structured paragraph flow
  • avoid unnecessary repetition
  • write in clear, predictable patterns

Ironically, these traits also define many AI-generated texts.

So the cleaner and more organized the writing becomes, the more likely it is to resemble machine patterns. This creates a strange contradiction where quality writing can be misinterpreted as artificial.

The Changing Behavior of Writers

As AI checker tools become more common, they are beginning to influence writing behavior in subtle ways.

Writers may:

  • deliberately vary sentence structure
  • introduce irregular phrasing
  • avoid overly consistent tone
  • reduce clarity to appear more “human-like”

This creates a new tension: writing for communication versus writing for detection resistance.

Over time, this may reshape writing styles across industries without people fully realizing it.

Aiチェッカas Pattern-Based Systems

At their core ,aiチェッカ are pattern recognition systems.

They compare input text against large datasets of known human and AI-generated writing. If a match is statistically closer to AI patterns, the system increases its AI likelihood score.

However, this approach has limitations:

  • language evolves constantly
  • writing styles vary across cultures and industries
  • AI models are trained on human data
  • humans increasingly adopt AI-assisted writing styles

Because of this, aiチェッカ results are always contextual, never absolute.

The Growing Grey Zone of Authorship

Modern content creation rarely falls into a simple category of “human” or “AI.”

Instead, many texts are:

  • drafted by humans
  • refined using AI tools
  • edited for SEO optimization
  • rewritten multiple times by different systems

This creates hybrid authorship, where origin is layered rather than singular.

AI checkers struggle in this environment because their aiチェッカ models are built around a binary assumption that no longer reflects reality.

Why Context Matters More Than Scores

An AI checker cannot determine intent. It does not know:

  • whether text is creative or technical
  • whether repetition is stylistic or accidental
  • whether structure is intentional or generated

Yet it still produces a single score or classification.

This disconnect highlights an important limitation: structure alone cannot define authorship.

The Rise of Pre-Checking Writing

An interesting behavioral shift is emerging: writers now run their own text through AI checkers before publishing.

This turns the tool into a feedback loop rather than a gatekeeper. Writers adjust tone, restructure sentences, and modify phrasing based on detection results—even when the content is fully original.

In this way, the AI checker is influencing writing indirectly, shaping style through feedback pressure.

What AI Checkers Are Really Measuring

At a deeper level, AI checkers are not measuring “human vs AI.” They are measuring:

  • predictability vs variability
  • structure vs randomness
  • statistical alignment vs deviation

This means the output is less about authorship and more about linguistic behavior.

The Future: From Detection to Transparency

As AI-generated content becomes more integrated into everyday writing, the focus may shift away from detection entirely.

Instead of asking:
“Was this written by AI?”

The future question may become:
“How was this created, and what processes were involved?”

This shift would prioritize transparency over classification, reducing the need for rigid labeling systems.

Final Reflection

The AI checker is not a final authority on writing authenticity. It is a probabilistic system interpreting language patterns in a rapidly evolving environment.

Its influence is not just technical—it is behavioral. It is quietly shaping how people write, edit, and even think about writing.

And as language continues to evolve alongside AI, the most important shift may not be in detection accuracy—but in how we define authorship itself.

See More Articles: Clicking Here 

READ MORE
best whitening cream in Pakistan

Radiance Redefined: Finding the Best Whitening Cream in Pakistan for Naturally Glowing Skin

Introduction

Skincare has become an important part of everyday life, especially in regions where weather, pollution, and sun exposure can affect the skin’s appearance. In Pakistan, many people look for effective solutions to achieve a brighter, more even complexion while also maintaining healthy, nourished skin. This is where the search for the best whitening cream in Pakistan begins—not as a shortcut to beauty, but as a way to support skin health and enhance natural radiance.

A good whitening cream is not about changing who you are. It is about improving skin clarity, reducing dullness, and helping the skin look refreshed, smooth, and well cared for.

What Does a Whitening Cream Really Do?

Modern skincare has evolved significantly. Today’s whitening creams are less about dramatic changes and more about improving skin tone appearance, hydration, and texture.

The best whitening cream in Pakistan typically works by:

  • Reducing the appearance of dullness
  • Helping even out skin tone
  • Moisturizing and nourishing the skin
  • Supporting a brighter, fresher look
  • Improving overall skin texture

Instead of harsh bleaching effects, advanced formulations focus on gentle enhancement and long-term care.

Key Ingredients That Support Skin Brightness

When selecting a whitening cream, ingredients are more important than marketing claims. Skin responds best to scientifically supported and naturally derived components.

Vitamin C

A powerful antioxidant known for supporting skin brightness and protecting against environmental damage.

Niacinamide

Helps improve skin tone appearance and enhances overall smoothness.

Licorice Extract

Traditionally used in skincare for promoting a more balanced complexion.

Alpha Arbutin

A popular ingredient that helps reduce visible unevenness in skin tone.

Hyaluronic Acid

Provides deep hydration, making skin appear plump and healthy.

Natural Botanical Extracts

Aloe vera, green tea, and other plant-based ingredients soothe and refresh the skin.

The best whitening cream in Pakistan often combines these elements to create a balanced formula that is both effective and gentle.

Choosing the Right Cream for Your Skin Type

Every skin type has different needs, and selecting the right product makes a significant difference in results.

Oily Skin

Lightweight, non-greasy creams work best. Gel-based whitening creams help control excess oil while maintaining hydration.

Dry Skin

Rich, moisturizing formulas with hydrating agents help restore softness and prevent flakiness.

Combination Skin

Balanced formulations that hydrate without heaviness are ideal.

Sensitive Skin

Fragrance-free, dermatologically tested creams reduce the risk of irritation and support gentle care.

Understanding your skin type ensures that the best whitening cream in Pakistan works effectively without unwanted side effects.

Pakistan’s Climate and Its Impact on Skin

Pakistan’s climate varies from intense summer heat to dry winter air, both of which affect skin health. Sun exposure can cause tanning and uneven tone, while dust and pollution contribute to dullness and clogged pores.

A good whitening cream helps permanent skin whitening cream in Pakista combat these environmental effects by:

  • Providing hydration in dry conditions
  • Supporting skin repair after sun exposure
  • Protecting against environmental stress
  • Maintaining a fresh and even look

This makes consistent skincare especially important in local conditions.

Building a Complete Skincare Routine

A whitening cream works best when used as part of a complete skincare routine. Healthy skin is the result of consistent care rather than a single product.

A simple routine may include:

  • Gentle cleansing twice a day
  • Applying toner to refresh the skin
  • Using whitening cream for nourishment
  • Applying sunscreen during the day
  • Staying hydrated and eating balanced meals

The best whitening cream in Pakistan enhances results when paired with these healthy habits.

Natural Glow vs Artificial Whitening

Modern skincare is shifting toward natural beauty rather than unrealistic transformations. The goal is not to drastically change skin color but to improve clarity, smoothness, and brightness.

A quality whitening cream supports:

  • A healthier skin appearance
  • Natural radiance
  • Even texture
  • Reduced dullness

True beauty lies in skin that looks cared for, not artificially altered.

Conclusion

Choosing the best whitening cream in Pakistan is about more than following trends. It is about understanding your skin, selecting the right ingredients, and maintaining a consistent skincare routine that supports long-term health and radiance.

When used correctly, a good whitening cream enhances natural beauty rather than masking it. It helps skin look fresher, smoother, and more balanced—reflecting care, confidence, and healthy living from within.

READ MORE